
- May 31, 2026
Step-by-Step Instructions
Step 1: Prepare the Coconut Filling
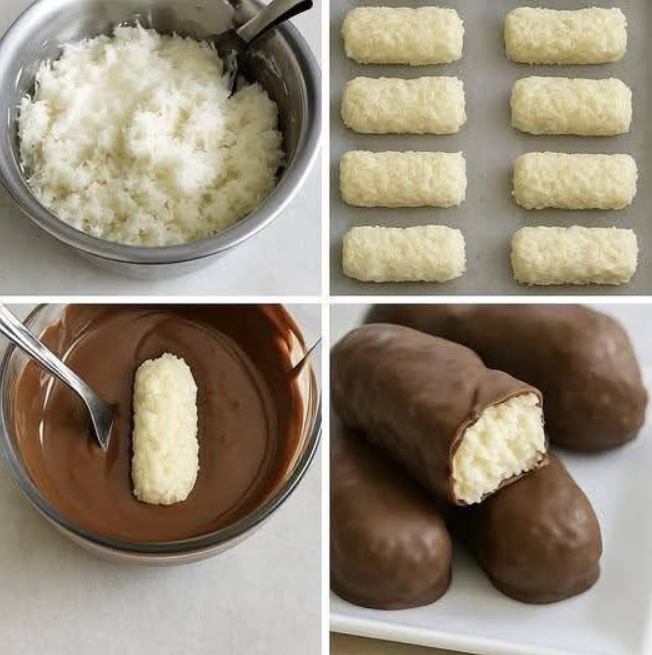
In a large mixing bowl, combine your unsweetened shredded coconut, thick coconut cream, and your preferred powdered keto sweetener. Use a sturdy spoon or a flexible spatula to mix the ingredients thoroughly. You want to press the mixture against the sides of the bowl to ensure the moisture from the coconut cream is fully absorbed by the dry shreds. The final texture should resemble a thick, moldable dough that holds its shape when squeezed in your hand.
Step 2: Shape the Bars
Line a small baking sheet or a flat tray with parchment paper or wax paper. Scoop out roughly two tablespoons of the coconut mixture at a time. Using clean hands, firmly compress the mixture and shape it into uniform, rectangular logs with rounded edges—resembling classic coconut candy bars. Place each shaped bar onto the prepared parchment paper, leaving a bit of space between them. Once all the bars are shaped, place the tray into the freezer for at least 20 to 30 minutes to firm up completely. Hardening the centers makes the dipping process much easier.
Step 3: Melt the Chocolate Coating
While the filling is chilling in the freezer, prepare your chocolate coating. Place your sugar-free vegan chocolate chips into a microwave-safe bowl. If your chocolate is exceptionally dark, you can add a tiny teaspoon of unrefined coconut oil to help it melt smoothly and create a glossier finish. Microwave the chocolate in 30-second intervals, stirring thoroughly between each session to prevent burning. Alternatively, you can melt the chocolate using a double boiler over low heat on the stovetop. Let the melted chocolate cool slightly so it isn’t piping hot when you dip the frozen bars.
Step 4: Dip and Coat
Remove the hardened coconut bars from the freezer. Using a fork or a dipping tool, carefully drop one coconut bar into the melted chocolate. Turn it over gently to ensure all sides are completely submerged and coated. Lift the bar out with your fork, tapping it gently against the rim of the bowl to let any excess chocolate drip back down into the mixture. Carefully slide the chocolate-coated bar back onto the parchment-lined tray.
Step 5: Final Chill and Serve
Repeat the dipping process for all remaining bars. Because the coconut centers are frozen, the chocolate shell will begin to set almost immediately. Once all the bars are coated, return the tray to the refrigerator or freezer for another 10 minutes to let the chocolate outer shell completely harden. Once set, they are ready to be enjoyed!
Pro-Tips for Perfect Results
-
The Squeeze Test: If you find that your coconut filling is too crumbly to hold its shape while rolling, add an extra tablespoon of coconut cream to add moisture. If it feels too wet or sticky, throw in a few more tablespoons of shredded coconut.
-
Smooth Coating: Keep your dipping fork clean. Wipe it down periodically so excess clumps of chocolate don’t distort the smooth texture of the next bar you dip.
-
Storage Savvy: Because these bars contain clean, unrefined coconut oils and creams without chemical preservatives, they will soften at room temperature. Always store your finished bars in an airtight container inside the refrigerator for up to two weeks, or in the freezer for up to three months for a firm, frozen treat.
Frequently Asked Questions
Can I use liquid sweeteners like stevia drops or maple syrup?
If you want to keep this recipe strictly keto, avoid maple syrup or agave, as they are high in sugar. Liquid stevia or monk fruit drops can be used, but keep in mind they do not add volume or binding capability. If you use liquid drops, you may need slightly more coconut cream to compensate for the missing bulk of a powdered sweetener.
Why is my chocolate coating thick and clumpy?
Sugar-free chocolate can sometimes be more temperamental to melt than traditional sugar-laden chocolate. If your chocolate is too thick to dip smoothly, stir in a small amount of coconut oil or cocoa butter while it is warm. This thins out the liquid beautifully, making it perfect for a smooth, even glaze.