- December 5, 2025
Page 2: The Breading Process and Frying Technique
🧑🍳 Step-by-Step Breading (The Japanese Way)
The breading technique, known as the “standard breading procedure,” is what gives Katsu its signature texture. Ensure your hands are dry before starting. Use one hand (the “wet hand”) for the egg, and the other (the “dry hand”) for the flour and panko, to keep things tidy.
-
Skewer the Chicken: Thread 3-4 pieces of the seasoned chicken onto each soaked wooden skewer. Do not pack them too tightly; leave a small space between each piece.
-
First Coat (Flour): Take one skewer and lightly dredge the chicken pieces in the flour (Dish 1). Shake off any excess flour. The flour helps the egg adhere better.
-
Second Coat (Egg Wash): Dip the floured chicken into the egg wash (Dish 2), ensuring all surfaces are lightly covered. Let the excess egg drip off briefly.
-
Final Coat (Panko): Immediately transfer the egg-washed chicken to the panko breadcrumbs (Dish 3). Gently press the panko firmly onto all sides of the chicken. The goal is to have a complete, thick, and shaggy coating of panko. Do not miss this step of pressing!
-
Rest: Place the fully breaded skewers on a clean tray or plate. Repeat the process for the remaining skewers. For the best result and to prevent the coating from falling off, let the breaded skewers rest for 10-15 minutes before frying. This allows the coating to properly “set.”
🌡️ Deep-Frying for Maximum Crispiness
The temperature of the oil is paramount in deep-frying. If the oil is too cold, the chicken will soak up oil and become soggy. If it’s too hot, the coating will burn before the chicken cooks through.
-
Heat the Oil: Pour the high smoke point oil into your deep pot or Dutch oven. The oil should be deep enough to completely submerge the chicken pieces (about 1.5 to 2 inches deep). Heat the oil over medium-high heat until it reaches the ideal frying temperature of $325^\circ \text{F}$ to $340^\circ \text{F}$ ($160^\circ \text{C}$ to $170^\circ \text{C}$). Use a thermometer to confirm.
-
Test the Oil (If No Thermometer): Drop a pinch of panko into the oil. If it immediately sizzles and turns golden brown in about 30 seconds, the oil is ready.
-
Fry in Batches: Carefully lower 3-4 skewers into the hot oil, ensuring you do not overcrowd the pot. Overcrowding will drastically drop the oil temperature.
-
Cooking Time: Fry the chicken for approximately 4 to 6 minutes, turning them occasionally with the spider strainer or tongs, until they are a deep, uniform golden-brown color and the internal temperature reaches $165^\circ \text{F}$ ($74^\circ \text{C}$).
-
Drain and Rest: Once cooked, lift the skewers from the oil and hold them briefly over the pot to drip off excess oil. Immediately transfer them to the wire cooling rack placed over the baking sheet. The wire rack is crucial as it allows air to circulate underneath, preventing the bottom of the katsu from getting soggy. Avoid placing them on paper towels, as this can steam the crust.
-
Maintain Temperature: While frying the next batch, allow the oil to return to the target temperature of $325^\circ \text{F}$ to $340^\circ \text{F}$.
Page 3: Troubleshooting, Serving Suggestions, and SEO Optimization
** Troubleshooting Common Katsu Issues**
| Issue | Cause | Solution |
| Soggy or Oily Crust | Oil temperature too low, or overcrowding the pot. | Ensure the oil stays between $325^\circ \text{F}$ and $340^\circ \text{F}$. Fry in small batches and use the wire rack for draining. |
| Coating Falls Off | The breading wasn’t pressed firmly enough, or the chicken wasn’t rested. | Press the panko firmly onto the chicken. Allow the breaded skewers to rest for 10-15 minutes before frying. |
| Burnt Outside, Raw Inside | Oil temperature too high. | Lower the heat immediately. Aim for $325^\circ \text{F}$ to $340^\circ \text{F}$. The color should be a deep golden brown when cooked through. |
Serving & Presentation Suggestions
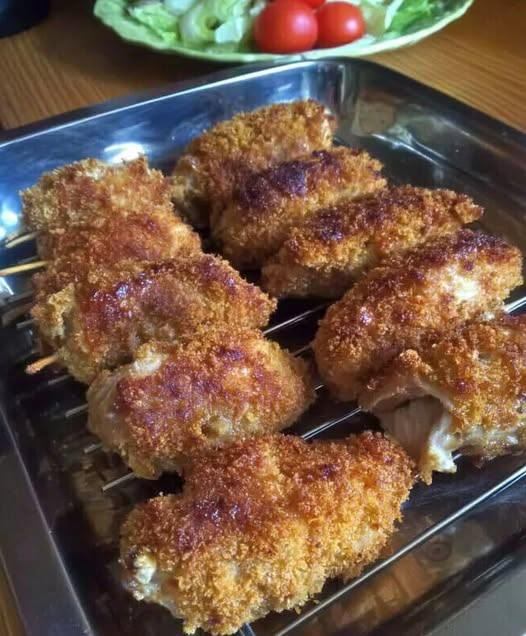
The key to an authentic Katsu experience is simple, beautiful presentation that mirrors the image.
-
Classic Plate: Serve the Crispy Chicken Katsu Skewers on a bed of finely shredded cabbage (a must-have side in Japan, as it aids digestion). The skewers are traditionally served upright or neatly laid out on a wire rack to maintain crispness.
-
Accompaniments:
-
Katsu Sauce: Always serve the prepared dipping sauce in a small dish alongside the skewers for dipping.
-
Rice: A bowl of steamed Japanese short-grain white rice (gohan).
-
Miso Soup: A small bowl of light miso soup makes a perfect counterpoint to the richness of the fried food.
-
Garnish: A squeeze of fresh lemon juice brightens the flavor.
-
Recipe Variations for Home Chefs
-
Tonkatsu: Substitute the chicken with thin, pounded slices of pork loin.
-
Baked/Air-Fried Katsu: For a healthier option, spray the breaded skewers with cooking spray. Bake at $400^\circ \text{F}$ ($200^\circ \text{C}$) for 15-20 minutes, or air-fry at $380^\circ \text{F}$ ($195^\circ \text{C}$) for 10-12 minutes, flipping halfway, until golden and crispy. The crisp will be slightly less intense than deep-frying.
-
Cheese Katsu: Insert a small slice of mozzarella or provolone cheese into the center of the chicken pieces before breading.
Keywords for SEO and Visibility
To help this recipe reach a wider audience, here are some high-value keywords used within the text:
-
Crispy Chicken Katsu Skewers
-
Kushi Katsu Recipe
-
Japanese Deep Fried Chicken
-
Panko Chicken Skewers
-
Authentic Japanese Katsu
-
Easy Chicken Katsu
-
Katsu Sauce Recipe
-
How to Make Katsu at Home
Enjoy this iconic Japanese dish! It’s a testament to the fact that sometimes, the simplest preparation—just a beautiful, crispy coating—can yield the most satisfying results.