
- December 18, 2025
🍗 The Ultimate Crispy Stuffing Balls with Silky Golden Gravy: Your New Favorite Holiday Appetizer! 🍗
Welcome to the recipe that is about to change your holiday game forever! 🎄 Whether you are looking for the perfect Thanksgiving side dish, a clever way to use up Christmas leftovers, or just a cozy weekend treat, these Crispy Stuffing Balls are the answer. 😋
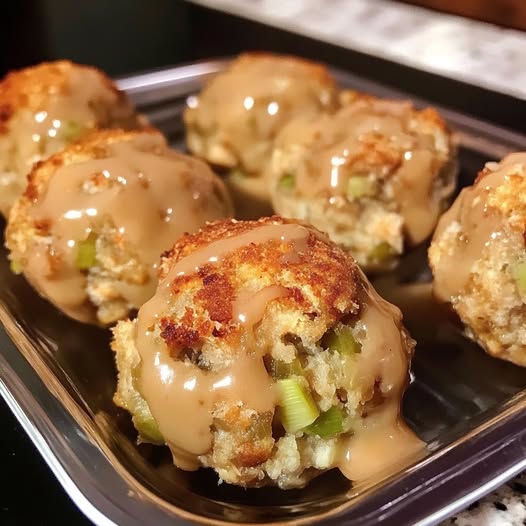
Imagine a bite that is perfectly golden and crunchy on the outside, but soft, herbaceous, and savory on the inside. Then, top it off with a rich, velvety gravy that ties all the flavors together. 🤤 It’s like a warm hug in food form! Let’s dive into how you can recreate this exact photo in your own kitchen. 🏠✨
🌟 Why You’ll Love These Stuffing Balls 🌟
Before we get to the “how-to,” let’s talk about the “why.” These aren’t just your average bread cubes. 🥖 Here is why this recipe is a total winner:
-
Texture Heaven: The contrast between the oven-baked (or air-fried!) crust and the moist center is addictive. 🔥
-
Perfect Portions: No more messy scooping! These are pre-portioned and look beautiful on a serving platter. 🍽️
-
Versatility: You can make them vegetarian, add sausage for a meaty kick, or even make them gluten-free! 🥦🥓
-
The Gravy Factor: Drizzling the gravy on top ensures every single bite is juicy and flavorful. 🍯
🛒 What You’ll Need (The Ingredients) 🛒
Gather these ingredients to get started. High-quality herbs and fresh vegetables make all the difference here! 🌿
For the Crispy Stuffing Balls:
-
6-8 Cups of Bread Cubes: Use a mix of sourdough and white bread for the best texture. 🍞
-
1 Cup Celery: Finely chopped. This provides that classic “crunch” and fresh flavor you see in the photo! 🥬
-
1 Large Yellow Onion: Finely diced to melt into the bread. 🧅
-
1/2 Cup Unsalted Butter: Because everything is better with butter! 🧈
-
2-3 Cups Chicken or Vegetable Broth: Add this slowly to reach the perfect consistency. 🥣
-
2 Large Eggs: These act as the “glue” to keep your balls perfectly round. 🥚
-
Fresh Herbs: A mix of sage, rosemary, and thyme (the “holiday trio”). 🌿
-
Salt & Black Pepper: To taste. 🧂
-
Optional: Cooked crumbled sausage or dried cranberries for a sweet-and-savory twist! 🍒
For the Silky Golden Gravy:
-
4 Tablespoons Butter: 🧈
-
1/4 Cup All-Purpose Flour: To create a smooth roux. 🌾
-
2 Cups Beef or Turkey Stock: For a deep, rich color and flavor. 🥘
-
A Splash of Heavy Cream: This is the secret to that glossy look in the photo! 🥛
-
Salt, Pepper, and a pinch of Onion Powder. 🧂
👩🍳 Step-by-Step Instructions: Creating Magic 👨🍳
Follow these steps closely to achieve that perfect golden-brown finish! 🌟
Step 1: Prep the Aromatics 🧅
Start by melting your butter in a large skillet over medium heat. Add your finely chopped celery and onions. Sauté them until they are soft and translucent (about 5-7 minutes). This is where the base of your flavor lives! ✨ Sprinkle in your fresh herbs during the last minute of sautéing to wake up those essential oils. 🌿
Step 2: The Bread Mix 🍞
In a massive mixing bowl, toss in your bread cubes. Pour the buttery onion and celery mixture over the top. Give it a good toss! 🥣
Step 3: Hydrate and Bind 🥚
Whisk your eggs into 1 cup of the broth. Slowly pour this over the bread. Start mixing with your hands or a large spoon. Add more broth half a cup at a time until the mixture is moist enough to hold its shape when squeezed but isn’t “soggy.” 💧
Step 4: The Rolling Phase 👐
Line a baking sheet with parchment paper. Scoop about 2 tablespoons of the mixture and roll it into a ball (roughly the size of a golf ball). Pro Tip: Wet your hands slightly to keep the mixture from sticking to your palms! 🖐️ Place them on the tray with a little space between each one.
Step 5: The Bake 🔥
Preheat your oven to 375°F (190°C). Lightly spray the tops of the balls with olive oil or melted butter for extra crunch. Bake for 20-25 minutes until the tops are beautifully browned and the celery looks tender. 🌡️
Step 6: The Gravy Drizzle 🍯
While the balls are baking, melt butter in a saucepan, whisk in flour for 2 minutes, then slowly add your stock while whisking constantly. Let it simmer until thickened, then stir in the cream. Season to perfection! 🥄
💡 Pro Tips for the Best Results 💡
-
Don’t Overmix: Handle the bread gently so the balls stay light and airy, not dense like lead weights! 🎈
-
The Air Fryer Method: If you want them extra crispy, pop them in the air fryer at 350°F for 10-12 minutes. They come out incredible! 🍟
-
Make-Ahead Magic: You can roll these balls a day in advance and keep them in the fridge. Just bake them fresh when your guests arrive! ⏰
-
Vegetarian Swap: Use vegetable broth and butter alternatives to make this dish 100% vegetarian-friendly. 🥗
🍽️ How to Serve and Store 🍽️
Serving: Arrange the hot stuffing balls on a dark platter (just like in the photo!) to make the colors pop. Drizzle the warm gravy over the top right before serving so they stay crunchy. Garnish with a little extra fresh parsley or chives for a gourmet touch! 🌿✨
Storing: If you actually have leftovers (unlikely! 😂), store them in an airtight container in the fridge for up to 3 days. To reheat, use the oven or air fryer to bring back that signature crunch—the microwave will make them soft. ❄️
🌈 Final Thoughts 🌈
These Crispy Stuffing Balls are more than just a side dish; they are a conversation starter! 🗣️ They take the best part of the holiday meal—the stuffing—and turn it into a fun, finger-food experience. Your friends and family will be asking for the recipe before they’ve even finished their first bite. 😋
Happy cooking, and may your kitchen be filled with the amazing aroma of sage, butter, and joy! 🏠❤️🍂


