
- December 6, 2025
2. Crafting the Key Lime Filling 🧪
-
Prep the Mix: In a large mixing bowl, combine the sweetened condensed milk, Key lime juice, egg yolks, Key lime zest, and a pinch of salt.
-
Whisk Until Thick: Vigorously whisk the ingredients together for about 3 to 5 minutes. The mixture will visibly thicken as the acid from the lime juice reacts with the milk. It should become pale yellow and thick enough to coat the back of a spoon. Pro Tip: Use a rubber spatula to scrape down the sides to ensure everything is perfectly incorporated. 🥄
-
Fill the Crust: Pour the creamy, zesty filling into the cooled oatmeal crust.
-
Bake the Pie: Return the pie to the preheated oven. Bake for 15-18 minutes. The filling is done when the edges are set and firm, but the center still has a slight, gentle wobble (like soft gelatin) when the pie plate is carefully shaken. Do not overbake—overbaking can cause the filling to crack and become rubbery! ⛔
3. Cooling and Chilling (The Hard Part: Waiting!) ⏳
-
Initial Cool: Remove the pie from the oven and place it on a wire rack to cool to room temperature (about 1-2 hours).
-
The Chill Factor: Once cool, cover the pie loosely with plastic wrap (ensure the wrap doesn’t touch the filling!) and transfer it to the refrigerator. Chill for a minimum of 4 hours, but ideally overnight, to allow the filling to fully set into that perfect, smooth, sliceable texture. Patience is a virtue here! 🙏
🥳 Page 3: The Grand Finale – Topping, Slicing, & SEO Notes
4. Making the Cloud-Like Whipped Cream ☁️
-
Super Chill: Place a large mixing bowl and your whisk attachment (or beater) in the freezer for about 10-15 minutes. A very cold environment is essential for stiff peaks. 🥶
-
Whip It: Pour the cold heavy whipping cream into the chilled bowl. Start beating on medium speed. As the cream begins to thicken, gradually add the powdered sugar and vanilla extract.
-
Stiff Peaks: Increase the speed to medium-high. Continue beating until stiff peaks form (this means when you lift the whisk, the peaks of cream stand straight up without drooping). Be careful not to over-whip, or you’ll end up with butter! 😅
-
Decorate: Once the pie is fully chilled and ready to serve, you have two options:
-
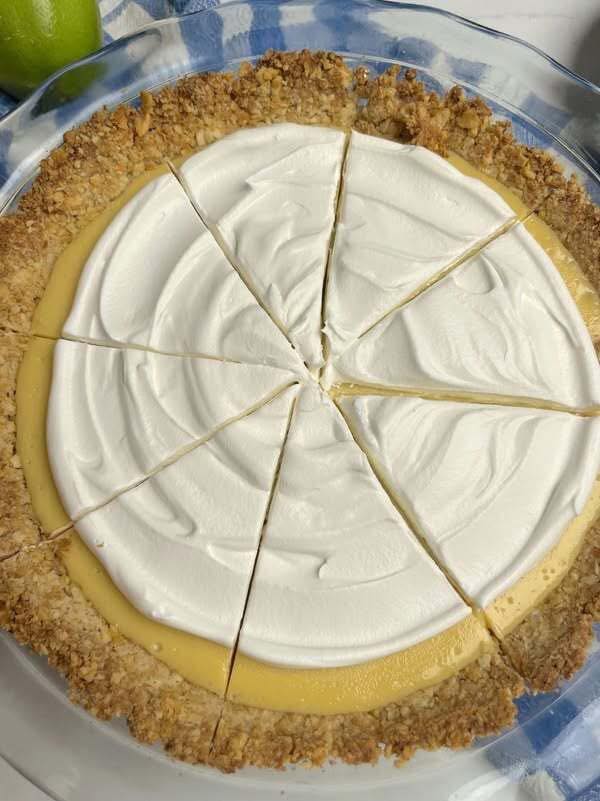
The Photo Look: Spread the whipped cream evenly over the top of the entire pie using an offset spatula, ensuring it covers the whole filling. Then, slice the pie into 8 equal wedges (as shown in your image) before serving. 🍰
-
The Fancy Look: Use a piping bag fitted with a large star tip (like a $1\text{M}$ or similar) and pipe generous swirls of cream around the edge of the pie or dollop it on each slice just before serving.
-
-
Garnish: Finish with a sprinkle of fresh Key lime zest for an extra pop of color and aroma! 🌈
5. Serving and Storage 🍽️
-
Serving: Slice the pie with a sharp, thin-bladed knife, wiping the knife clean between cuts for those beautiful, sharp edges seen in the photo. Serve chilled.
-
Storage: Leftovers can be stored in an airtight container in the refrigerator for up to 3-4 days.
🏷️ SEO-Optimized Keywords and Notes
This section is for maximizing discoverability on search engines (SEO).
Recipe Keywords:
-
Key Lime Pie Recipe
-
Oatmeal Crust Key Lime Pie
-
Homemade Whipped Cream Topping
-
Creamy Key Lime Pie Filling
-
Baked Key Lime Pie
-
Easy Dessert Recipe
-
Tart and Sweet Pie
-
Classic Key Lime Dessert
Key Notes for Success (The “Why”):
-
Fresh Juice is Non-Negotiable: The flavor of fresh Key Lime juice is brighter, more aromatic, and less bitter than bottled juice. Take the time to squeeze them—it makes a difference! 💯
-
The Magic of Condensed Milk: Sweetened condensed milk is not a substitute for regular milk. It’s what creates the chemical reaction with the acid in the lime juice, setting the pie without excessive baking.
-
Crust Texture: Grinding the oats coarsely, not finely, is key to achieving that rustic, chewy-crunchy texture that complements the smooth filling so well.
-
Chill Time: Don’t rush it! The 4+ hours of chilling are essential for the filling to fully firm up, allowing you to get those perfect, clean slices. 🧊
Enjoy your spectacular homemade Key Lime Pie! It’s a true masterpiece of texture and flavor! 🎉


