
- December 6, 2025
👩🍳 Page 2: Step-by-Step Baking Instructions
Phase 1: Preparing the Crusts (The Flaky Shells) 🧈
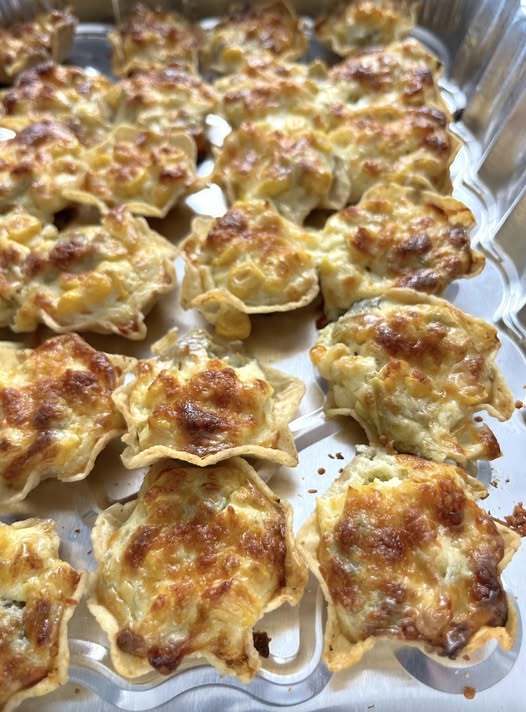
The perfect crust is paramount! Follow these steps carefully to achieve those beautiful, star-like edges seen in the image.
-
Preheat & Prepare: Preheat your oven to $400^{\circ} \text{F}$ ($200^{\circ} \text{C}$). Lightly grease a standard 12-cup muffin tin or use a mini tart pan. Pro Tip: The standard muffin tin works perfectly for a slightly deeper ‘cup’ look.
-
Cut the Pastry: Unroll the chilled pastry sheets. Using a round cookie cutter or the rim of a glass (approx. 3-3.5 inches / 7.5-9 cm in diameter), cut out 24 rounds. Knead the scraps together and re-roll to cut the remaining rounds.
-
Shape the Tarts: Gently press each pastry round into a muffin cup. Press the dough firmly against the bottom and sides, allowing the edges to slightly overlap the cup, which gives them that rustic, homemade look. Prick the bottoms of the shells lightly with a fork (this helps prevent them from puffing up too much).
Phase 2: Crafting the Creamy Filling 🥣
This is where the magic happens—combining the savory and sweet elements into a lush custard.
-
Combine the Dairy: In a large bowl or liquid measuring cup (makes pouring easier!), gently whisk together the eggs, heavy cream, milk, salt, pepper, and the pinch of nutmeg until just combined. Avoid over-whisking, which can introduce too much air.
-
Add the Mix-ins: Stir in the majority of your dry ingredients: the corn kernels, the well-drained spinach, and the chopped chives.
-
Cheesy Layer: Distribute about half of the cheddar and Gruyère/Mozzarella blend evenly among the 24 pastry shells. This layer acts as a ‘barrier’ to prevent the crust from getting soggy.
Phase 3: Assembly and The Golden Bake ☀️
The final steps to achieving the beautifully browned tops!
-
Fill the Tarts: Carefully pour the prepared egg mixture over the cheese and vegetables in each shell. Fill them almost to the top, leaving a very small gap as the custard will puff up slightly.
-
The Golden Topping: Sprinkle the remaining cheddar/Gruyère cheese blend generously over the top of each mini tart. This is the cheese that will melt, brown, and create the irresistible golden crust you see in the picture!
-
The Two-Step Bake:
-
High Heat Start: Bake at $400^{\circ} \text{F}$ ($200^{\circ} \text{C}$) for 10 minutes.
-
Lower Heat Finish: Reduce the oven temperature to $350^{\circ} \text{F}$ ($175^{\circ} \text{C}$) and continue baking for another 10-15 minutes, or until the filling is set (it should not jiggle when you tap the pan) and the cheese on top is beautifully golden brown. Check them around the 18-minute mark for that perfect color.
-
-
Cooling: Remove from the oven and let them cool in the muffin tin for about 5 minutes. Use a small knife or offset spatula to gently loosen the edges before carefully transferring them to a wire rack to cool completely, or serve them warm! Enjoy! 😋
💡 Page 3: SEO Tips, Variations, and Storage
Maximize Your Recipe’s SEO Potential 🚀
To make this recipe a hit for search engines and readers alike, focus on these keywords and structure:
-
Primary Keywords: Mini Quiches, Savory Tarts, Corn and Cheese Quiche, Easy Appetizer
-
Long-Tail Keywords: Homemade Mini Quiches Recipe, Best Make-Ahead Brunch Tarts, Golden Brown Cheddar Corn Quiches.
Recommended Title Structure for Maximum Clicks:
The Best Golden Mini Corn & Cheese Savory Tarts (Easy Make-Ahead Quiches!)
Pro Baker Tips for Ultimate Success 🎯
-
Prevent a Soggy Bottom: Always add your cheese before the liquid filling, and make sure any vegetable you use (especially spinach or mushrooms) is squeezed completely dry. Excess moisture equals a soggy crust.
-
Chilling the Crust: If you are using homemade pastry, chilling the cut-out rounds for 10-15 minutes before filling will help them maintain their shape beautifully.
-
The Golden Finish: For an extra-deep golden brown top, you can turn the oven to Broil for the last 1-2 minutes, but watch them very carefully to prevent burning! 🔥
Delicious Filling Variations 🌈
These mini tarts are a perfect canvas for creativity! Here are some popular filling combinations you can easily swap in:
| Variation Name | Key Ingredients to Swap/Add | SEO Keyword Focus |
| Florentine | Sautéed mushroom 🍄 and Feta cheese | Spinach and Feta Mini Quiche |
| Ham & Swiss | Finely diced cooked ham 🥓 and grated Swiss cheese | Ham and Cheese Tartlets |
| Broccoli Cheddar | Finely chopped steamed broccoli 🥦 (very dry!) and cheddar | Mini Broccoli Quiche Bites |
| Southwestern Spice | Black beans, diced bell pepper, and Pepper Jack cheese 🌶️ | Spicy Cheese Appetizers |
| Caramelized Onion | Slow-cooked caramelized onions and Goat cheese 🐐 | Savory Goat Cheese Tarts |
Storage and Reheating ❄️
These mini savory tarts are the ultimate make-ahead recipe, perfect for meal prepping!
-
Refrigeration (Make-Ahead): You can bake them 1-2 days in advance. Store in an airtight container in the fridge.
-
Freezing (Long-Term): Once completely cool, arrange the mini tarts in a single layer on a baking sheet and freeze. Once frozen, transfer them to a freezer-safe bag or container. They will last for up to 3 months!
-
Reheating: Reheat from the fridge or frozen state in a $350^{\circ} \text{F}$ ($175^{\circ} \text{C}$) oven until warmed through and the crust is crisp again (about 10-15 minutes for refrigerated, 20-25 minutes for frozen). A quick reheat in an air fryer also works wonders! 🌬️


