- December 6, 2025
The secret to a perfect apple pie is a flavorful filling that holds its shape.
-
Thaw the Phyllo: Take the phyllo dough out of the freezer and let it thaw in the refrigerator overnight (at least 8 hours). Do not skip this step! 🧊
-
Peel and Slice the Apples: Wash, peel, core, and thinly slice or grate your apples. For a rustic look like the image, thin slicing is best! Aim for slices about $1/8$-inch ($3$ mm) thick. Place them immediately in a large bowl. 🥣
-
The Lemon Bath: Drizzle the lemon juice over the apples and toss gently. This prevents oxidation and adds a crucial tang.
-
Spice and Sweeten: In a small bowl, whisk together the granulated sugar, brown sugar, flour (or cornstarch), cinnamon, and nutmeg.
-
Mix the Filling: Pour the sugar-spice mixture over the apples. Add the optional chopped nuts. Toss everything gently with a rubber spatula until all the apple slices are evenly coated. Let it Rest: Set the filling aside for at least 15-20 minutes. This allows the sugar to draw out excess moisture from the apples—which is key to avoiding a soggy pie! 💧
-
Drain (if necessary): If a significant pool of liquid forms at the bottom of the bowl after resting, drain it off. This ensures a firmer, more delicious filling! 🤤
Next Step: Ready to dive into the art of creating the crispy phyllo crust? Flip to Page 2! ➡️
(End of Page 1)
💫 Page 2: Assembling the Golden and Crispy Masterpiece 🖼️
SEO Keywords for This Page:
-
How to Layer Phyllo for Pie
-
Shredded Filo Dough Topping
-
Buttery Apple Pie Assembly
-
Baking Tips for Phyllo Crust
-
Springform Pan Apple Pie
Part 3: The Flaky Foundation and Shredded Top 🏗️
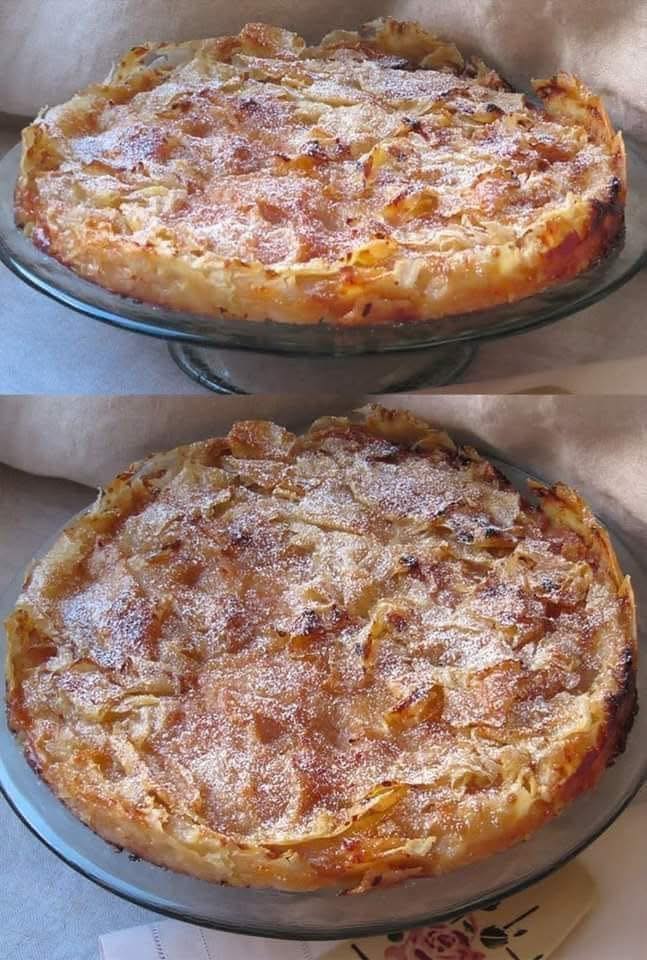
The unique look of the pie in your image is achieved by using the phyllo dough in two distinct ways: a layered base for structure and a ruffled/shredded top for maximum crispness and texture.
-
Preheat and Prepare: Preheat your oven to $350^\circ\text{F}$ ($175^\circ\text{C}$). Lightly grease a 9-inch (23 cm) springform pan or deep pie dish. You can also line the bottom with a circle of parchment paper for easy removal, especially with a springform. 🎂
-
Melt the Butter: Melt the butter in a small saucepan or microwave. You will need a pastry brush.
-
Prepare the Phyllo: Gently unroll the thawed phyllo dough. Immediately cover the stack with a slightly damp (not wet!) kitchen towel or plastic wrap. Phyllo dries out very quickly! 🌬️
-
The Bottom Layers (Structure): You will use about 12 sheets for the bottom.
-
Take the first sheet of phyllo, lay it on your work surface, and brush it lightly but completely with melted butter.
-
Place the sheet into the prepared pan, allowing the edges to hang over.
-
Repeat with the next sheet, buttering it and placing it on top, but rotate it slightly (about $45^\circ$). This rotation helps build structure and ensures the entire filling is covered, creating the deep folds that will form the side crust.
-
Continue this process until you have used 12 sheets, layering and rotating. Don’t worry if the phyllo wrinkles—it adds to the rustic charm! 💖
-
-
-
Add the Filling: Pour the entire apple mixture evenly into the phyllo-lined pan. Spread it out gently to fill the base.
-
Fold the Edges: Now, take the overhanging edges of the bottom phyllo layers and gently fold them inward over the apple filling, towards the center. Brush the folded edges with a little more melted butter to secure them. This creates a semi-closed top layer around the edges.
-
The Crispy Shredded Top (The Magic!): This is where you achieve the stunning texture seen in your photo. Use the remaining phyllo sheets (about 8-10 sheets).
-
Take 4-5 sheets at a time and butter them lightly on one side.
-
Now, scrunch, crinkle, or loosely shred the buttered sheets with your hands. You want lots of airy texture. 👐
-
Scatter the crinkled/shredded phyllo loosely and evenly over the top of the apple filling. The goal is volume and surface area for maximum crispness.
-
Repeat with the remaining sheets, always ensuring the top is well-buttered and beautifully ruffled. Don’t flatten them! The ruffles will bake into golden, crunchy perfection. 🌟
-
-
Final Butter Bath: Drizzle any remaining melted butter evenly over the top of the ruffled phyllo. The butter is what makes it gloriously golden and shatteringly crisp!
Next Step: Time to bake this beautiful creation and finish it with that elegant powdered sugar dusting! Head to Page 3. 🚀
(End of Page 2)
🔥 Page 3: The Bake, The Glaze, and Serving Instructions 🍽️
SEO Keywords for This Page:
-
Baking Time for Phyllo Apple Pie
-
Serving Tips for Greek Apple Pie
-
Storing Apple Pie with Phyllo
-
Dessert Presentation Ideas
-
Best Spices for Apple Pie
Part 4: The Golden Bake and Seductive Aroma 👃
-
The Main Event: Place the pie in the preheated $350^\circ\text{F}$ ($175^\circ\text{C}$) oven.
-
Initial Bake (30 minutes): Bake for 30 minutes. You will notice the phyllo puffing up and turning a light golden color.
-
Preventing Over-Browning (The Foil Hat Trick): If the top crust starts to brown too quickly (which is common with phyllo), loosely cover the pie with aluminum foil. This protects the delicate pastry while the apples continue to cook through. 🛡️
-
Final Bake (30-45 minutes): Continue baking for another 30-45 minutes, or until the phyllo is deep golden brown and the apple filling is bubbling and tender. To check for doneness, carefully insert a thin, sharp knife into the center—the apples should offer very little resistance.
-
Total Baking Time: Approximately 60-75 minutes.
-
-
Cooling is Crucial: Carefully remove the pie from the oven and place it on a wire rack. This step is non-negotiable! Allowing the pie to cool helps the filling set, making it easier to slice and ensuring those beautiful slices you see in the picture! ⏳ Allow it to cool for at least 1.5 to 2 hours.
Part 5: Presentation and Perfect Serving 🎀
Once the pie is cooled to lukewarm or room temperature, it’s time for the final, gorgeous touches!
-
The Signature Dusting: Just before serving, take a fine-mesh sieve and dust the entire top of the pie generously with confectioner’s sugar. This creates the snowy, elegant finish perfectly captured in your image. 🌬️ The contrast between the bright white sugar and the golden phyllo is stunning!
-
Serving Suggestions: This pie is a star on its own, but here are a few ways to elevate the experience:
-
Classic Pairing: Serve a slice warm with a scoop of premium vanilla bean ice cream. 🍨
-
Warm Glaze: Drizzle with a light caramel sauce or a simple honey-lemon syrup for extra moisture and sweetness.
-
Caffeine Companion: A strong cup of Greek coffee or a warming mug of spiced chai is the perfect accompaniment. ☕
-
-
Storage: Leftovers can be stored loosely covered at room temperature for up to 2 days, or in the refrigerator for up to 4 days. Reheat briefly in a $300^\circ\text{F}$ ($150^\circ\text{C}$) oven to re-crisp the phyllo.
Troubleshooting & Expert Tips! 💡
-
Soggy Bottom? You likely didn’t drain the apples enough. Let them sit longer or even sauté them briefly before mixing with the thickening agent to reduce moisture.
-
Phyllo Cracks/Tears? That’s okay! It’s flaky by nature. Keep it covered with the damp towel, work quickly, and remember that with this rustic, ruffled top, perfection is imperfection! 😉
-
For a Syrup Finish (Bougatsa Style): If you prefer a sticky, syrupy pie, prepare a simple syrup (1 cup water, 1 cup sugar, 1 cinnamon stick). Bring to a boil, then cool. Pour the cold syrup over the hot pie right after it comes out of the oven. Let it absorb completely before dusting with sugar.
Enjoy this delicious, crispy, and beautifully textured apple pie! Happy baking! 🥳