


- December 8, 2025
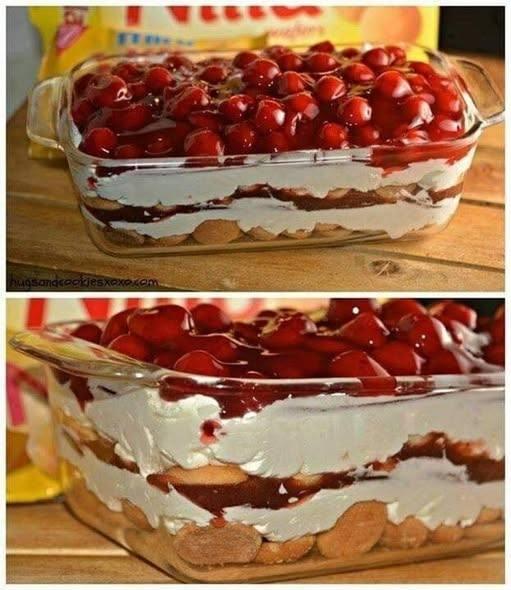
🍒 The Ultimate No-Bake Cherry Dream Dessert: A Layered Trifle Masterpiece 🍰
📌 Introduction: Welcome to Dessert Heaven!
Are you searching for a show-stopping dessert that requires zero oven time? Look no further! 👋 This No-Bake Cherry Dream Dessert (sometimes known as Cherry Tiramisu or Cherry Cheesecake Lasagna) is an absolute crowd-pleaser. It’s light, creamy, fruity, and boasts beautiful layers that make it perfect for holidays, gatherings, or a simple Sunday treat. 🥳
Inspired by the classic Italian Tiramisu, but featuring the vibrant tang of sweet cherries 🍒, this recipe is incredibly forgiving and simple enough for even beginner bakers (or should we say, non-bakers!). Get ready to impress everyone with this delightfully easy and elegant sweet. Let’s dive into the details! 👇
📝 Recipe Overview: No-Bake Cherry Dream Layers
This dessert is built on four key layers that create a symphony of texture and flavor:
-
The Biscuit Base: Soft, airy cookies (like Ladyfingers or a vanilla wafer) provide the classic tiramisu foundation. 🍪
-
The Creamy Layer: A lush, sweet, and tangy combination of cream cheese and whipped cream. 🍦
-
The Rich Layer: A drizzle or thin layer of something to add depth—like melted chocolate 🍫 or a coffee/milk soak.
-
The Cherry Crown: A generous topping of vibrant, glossy cherry pie filling. ✨
🛒 Ingredients: What You’ll Need
Make sure to have your 9×13 inch (or similar sized) glass baking dish ready!
Layer 1: The Cookie Foundation (The “Soak”)
-
1 (10-14 oz) package of Ladyfinger biscuits (Savoiardi) or Vanilla Wafers. 🍪
-
1/2 cup of milk (dairy or non-dairy), or strong, cooled coffee (for a Tiramisu twist). ☕
-
1 teaspoon of vanilla extract.
Layer 2 & 3: The Luscious Cream Filling
-
1 (8 oz) package of cream cheese, softened to room temperature. 🧀 (Crucial for a smooth cream!)
-
1 cup of powdered sugar (confectioners’ sugar).
-
1 teaspoon of vanilla extract.
-
1 (8 oz) tub of whipped topping (like Cool Whip), thawed, OR 2 cups of heavy whipping cream, whipped until stiff peaks form. 🥛
-
Optional: 1/4 cup of melted white chocolate chips 🤍 (to drizzle over the cookie layer for extra richness).
Layer 4: The Stunning Cherry Topping
-
2 (20-21 oz) cans of high-quality Cherry Pie Filling. 🍒
-
Optional: A squeeze of fresh lemon juice 🍋 (to brighten the cherry flavor).
👩🍳 Instructions: Step-by-Step Assembly
The best part? No oven needed! This is all about chilling and layering. 🧊
Step 1: Prep the Pan & Cookie Layer
-
Prepare the Soak: In a small, shallow dish, whisk together the milk (or coffee) and vanilla extract. 🥛
-
Soak & Lay: Quickly dip each Ladyfinger biscuit into the milk mixture for about 1-2 seconds per side. Do not over-soak! They should absorb a little moisture but still hold their shape.
-
Build the Base: Arrange the dipped Ladyfingers (or vanilla wafers) in a single, tight layer across the bottom of your glass dish. If using wafers, simply scatter them to cover the base. 🍪
-
Optional Richness: If using melted white chocolate, drizzle it lightly over the cookie layer now. Allow it to set for a minute or two. 🤍


