


- December 8, 2025
Step 2: Create the Creamy Filling
-
Cream the Base: In a large mixing bowl, beat the softened cream cheese, powdered sugar, and vanilla extract with an electric mixer until the mixture is completely smooth and lump-free. Stop to scrape down the sides. ✨
-
Fold in the Whip: Gently fold the thawed whipped topping (or fresh whipped cream) into the cream cheese mixture using a spatula. Be careful not to overmix—you want to keep the cream light and airy. ☁️
Step 3: Layer the Cream
-
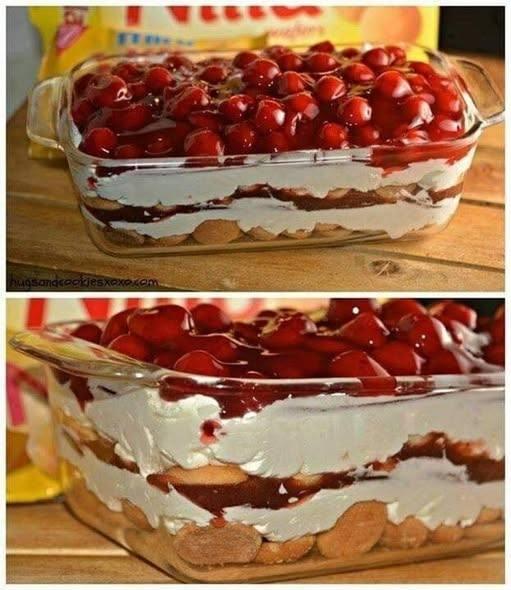
Spread Half: Carefully spread half of the creamy filling evenly over the cookie base layer. Use an offset spatula or the back of a spoon to create a smooth, beautiful layer. 🥄
-
Add More Cookies (Optional): If you want a double-layered cookie dessert, repeat Step 1 (Soak & Lay) to add a second layer of soaked biscuits over the cream. This creates a sturdier, more substantial dessert. 🍪🍪
-
Top with Remaining Cream: Spread the remaining half of the cream mixture over the second cookie layer (or directly on the first cream layer, if you skipped the middle cookies). Ensure the surface is as flat and smooth as possible. 📏
Step 4: The Grand Cherry Finale
-
Prep the Topping: Open the cans of cherry pie filling. If desired, stir in a tiny squeeze of lemon juice for a flavor boost. 🍋
-
Spoon and Spread: Gently spoon the cherry pie filling over the top cream layer. Start from the center and work your way out, ensuring the cream is completely covered by the luscious, red fruit. The contrast between the bright red cherries and the white cream is stunning! 😍
-
Garnish: For a final touch, you can add a few fresh cherries, a sprinkle of finely chopped nuts (like almonds or pecans), or a tiny dusting of powdered sugar. 🍒🌰
Step 5: Chill Time (The Hardest Part!)
-
Cover and Chill: Cover the dish tightly with plastic wrap.
-
Refrigerate: Place the dessert in the refrigerator for at least 6 hours, but ideally 8 hours or overnight. 🌙 This chilling time is essential! It allows the cookies to fully soften, the flavors to meld, and the cream layer to firm up, making it easy to slice and serve. 🧊
🍽️ Serving Suggestions & Tips
-
Serving: Cut into squares and serve directly from the dish. A wide, flat spatula works best. Enjoy! 😋
-
Make-Ahead: This is the perfect make-ahead dessert! It tastes even better on Day 2 or 3.
-
Storage: Keep covered tightly in the refrigerator for up to 5 days.
-
Flavor Variations: 🍓 Substitute the cherry filling with strawberry, blueberry, or lemon pie filling. 🫐🍋
-
Gluten-Free Option: Use gluten-free vanilla wafers or ladyfingers.
-
Healthier Twist: Use reduced-fat cream cheese and sugar substitute, but note this may slightly affect the cream’s firmness.
✨ SEO Keywords for Recipe Discovery
To make sure your amazing recipe gets found online, here are some high-value keywords used throughout the text:
-
No-Bake Cherry Dream Dessert
-
Layered Trifle Masterpiece
-
Cherry Tiramisu
-
No-Bake Cherry Cheesecake Lasagna
-
Easy No-Bake Dessert
-
Ladyfinger Dessert Recipe
-
Make-Ahead Dessert
-
Summer Dessert Idea
-
Cream Cheese Dessert
💡 Conclusion: Your Dessert Success Awaits!
You’ve done it! You now have a recipe for a gorgeous, delicious, and incredibly easy No-Bake Cherry Dream Dessert. This vibrant dessert is proof that you don’t need an oven to create something spectacular. 💯
Enjoy the smiles and compliments that are sure to follow when you present this stunning creation! Happy “no-baking”! 🎉
📏 Recipe Card (Summary)
| Category | Detail |
| Prep Time | 20 minutes |
| Chill Time | 6-8 hours (or overnight) 🌙 |
| Total Time | 6 hours, 20 minutes |
| Servings | 12-16 |
| Difficulty | Easy 🟢 |
| Equipment | 9×13 inch glass dish, Electric Mixer |


