
- June 1, 2026
Step 1: Prepare the Aloe Vera Leaf
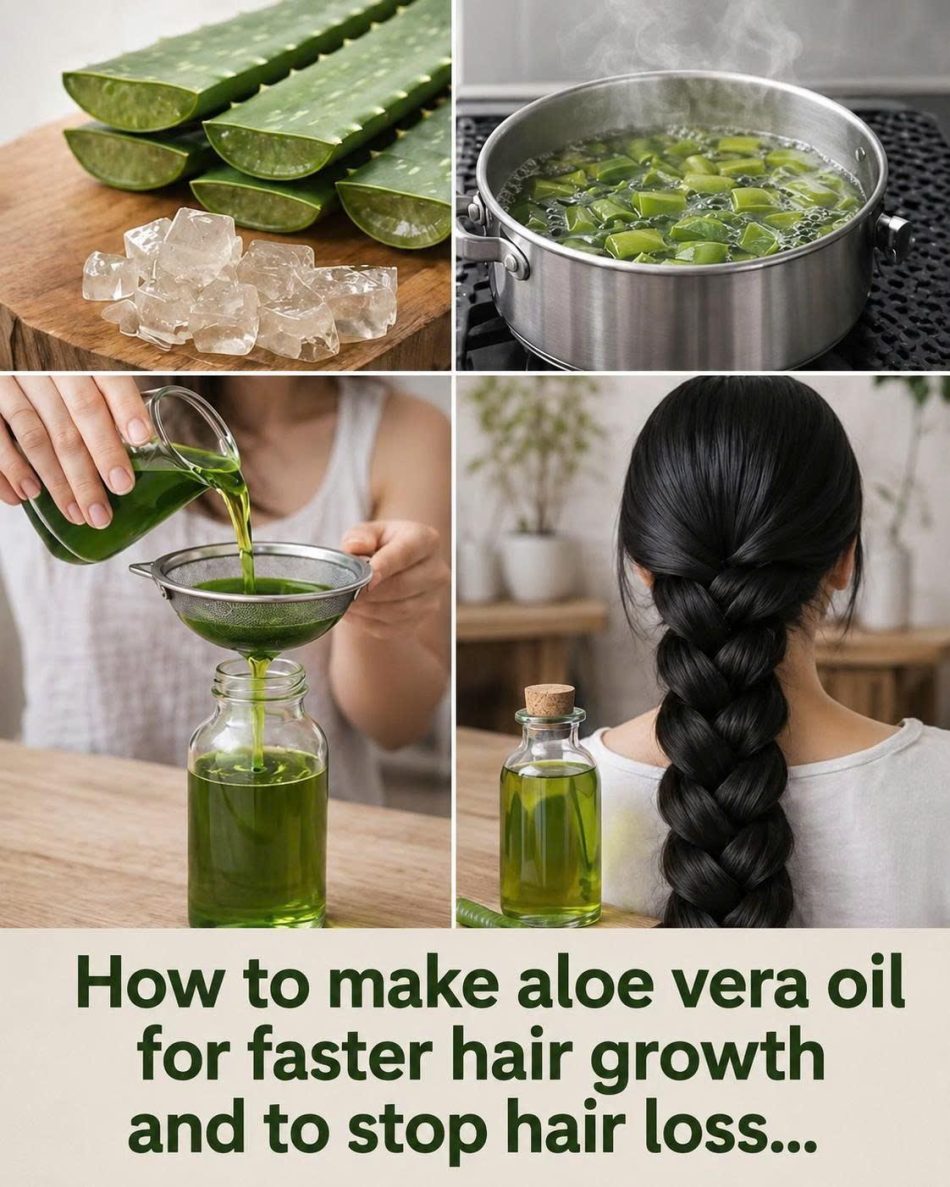
Start by thoroughly washing your fresh aloe vera leaf under cold water to remove any dirt or debris. Stand the leaf upright in a cup or bowl for about 10 to 15 minutes. This allows a yellowish sap called aloin to drain out. Aloin can cause skin irritation or itching for some people, so it is best to let it drain completely and wipe it away.
Step 2: Simmer and Infuse the Oil
Place your chopped aloe vera pieces into a saucepan and pour your one cup of carrier oil over them, ensuring the pieces are mostly submerged. Turn your stove to the lowest possible heat setting.
You will know it is ready when the aloe vera pieces change color, turning from a vibrant bright green to a translucent, slightly yellowish-brown hue, and the oil itself takes on a gorgeous green tint. Do not let the oil smoke or burn; keeping the heat low protects the sensitive nutrients.
Step 3: Cool and Strain the Green Elixir
Remove the pan from the heat and let it sit on the counter until it cools completely down to room temperature. This cooling period allows any remaining nutrients to lock into the oil.
Step 4: Storage
Store your homemade oil in a cool, dark, and dry place, away from direct sunlight. Because this recipe contains fresh botanical elements and no chemical preservatives, it will stay fresh and highly potent for about 2 to 3 months. To extend its shelf life even further, you can stir in 2 or 3 capsules of Vitamin E oil, which acts as a fantastic natural antioxidant and preservative.
How to Apply Aloe Vera Oil for Maximum Hair Growth
Now that you have crafted your fresh batch of liquid gold, the way you use it matters just as much as how you made it. Follow this targeted application routine twice a week to completely transform your hair health.
1. The Scalp Stimulation Massage
The most crucial step to stopping hair loss is delivering the oil directly to the roots. Part your hair into small sections using a comb. Using a dropper or your fingertips, apply the aloe vera oil directly onto your scalp.
Once your entire scalp is lightly coated, use the pads of your fingers (never your nails) to massage the oil in firm, circular motions. Massage your scalp for at least 5 to 10 minutes. This physical stimulation combined with the active nutrients in the oil encourages intense blood flow, feeding your hair roots instantly.
2. Protect Your Strands
After focusing on the scalp, work a small amount of the remaining oil through the mid-lengths and down to the very tips of your hair. Aloe vera acts as an exceptional humectant, meaning it locks moisture into the hair shaft, preventing the dry, brittle ends that lead to breakage and split ends.
3. The Deep Conditioning Wrap
Leave the oil treatment in your hair for a minimum of 45 minutes to 2 hours. For an ultra-deep treatment to reverse severe hair thinning, you can leave it on overnight. Just remember to lay a soft towel over your pillowcase to protect it from oil stains.
4. Washing It Out Properly
When it is time to wash, apply your regular shampoo directly onto your dry or slightly damp hair before soaking it completely under the shower water. Massage the shampoo thoroughly to break down the heavy oils first, then rinse with lukewarm water. Follow up with a second light shampoo wash to ensure your scalp is left completely clean, light, and completely free of residue.
Tips and Expectations
Consistency is your absolute best friend when it comes to natural hair remedies. You cannot expect overnight miracles, but if you commit to using this homemade aloe vera oil consistently 2 times a week, you will begin to notice a dramatic reduction in daily hair shedding within just 3 to 4 weeks.
By the time you reach the 2 to 3-month mark, you can expect to see healthy new “baby hairs” sprouting along your hairline and part lines, accompanied by a noticeable improvement in overall hair thickness, elasticity, and brilliant shine. Keep a fresh jar handy in your bathroom cupboard, stay patient, and enjoy the journey to a healthier, thicker, and completely revitalized head of hair!


