- December 8, 2025
-
Sauté the Aromatics: In a skillet, heat the remaining 1 tablespoon of olive oil over medium heat. Add the sliced red onion and cook for 5-7 minutes until soft and caramelized. Add the minced garlic and cook for 1 more minute until fragrant. Let the mixture cool slightly. 💨
-
Make the Filling: In a medium bowl, combine the chopped/drained red peppers, the cooled onion/garlic mixture, crumbled feta, softened cream cheese, chopped parsley, oregano, and black pepper. Mix gently but thoroughly until everything is evenly distributed. Do a taste test and adjust the salt if necessary. 😋
📄 Page 2: Step-by-Step Assembly & Baking Magic ✨
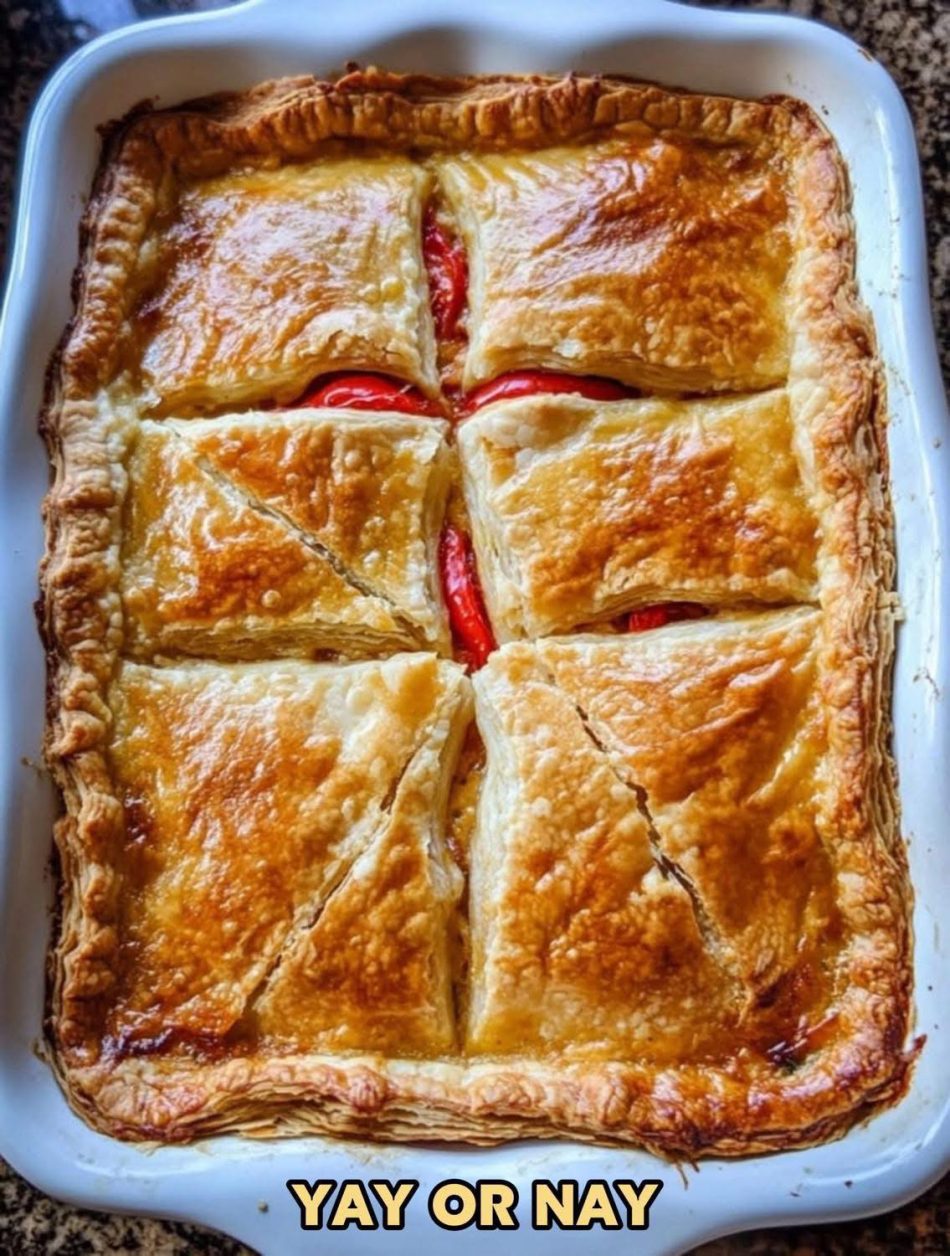
Now for the fun part: turning your prepped ingredients into the beautiful, golden-brown masterpiece shown in the picture! The key to that perfect puff is a cold oven and a hot temperature.
📐 Assembling the Puff Pastry Bake
This recipe assumes you are using a standard 9×13 inch (23×33 cm) baking dish, similar to the one in the photo.
-
Line the Dish: Lightly grease your baking dish. Place the first sheet of puff pastry into the dish. Gently press it into the bottom and up the sides. If your sheet is slightly smaller, stretch it gently without tearing. Pro Tip: Make sure the pastry is still relatively cold—this helps it puff! 🥶
-
Spread the Filling: Evenly spread the entire Red Pepper & Feta Filling mixture over the base layer of puff pastry. Ensure the filling stays within the edges, leaving about a 1-inch border of pastry around the perimeter. 🥄
-
Place the Top Layer: Carefully lay the second sheet of puff pastry over the filling. It should be wide enough to cover the filling. Trim any excess pastry that hangs too far over the dish. ✂️
-
Seal the Edges: Use your fingertips to press the edges of the top and bottom sheets together all around the dish. Then, use the tines of a fork to crimp and seal the edges firmly. This creates the beautiful, defined crust you see in the image. The crimping also ensures the filling doesn’t bubble out. 🔱
-
Score and Cut: This is how you achieve those neat individual portions! Using a sharp knife, gently score (do not cut all the way through yet!) the top layer of pastry to mark your portions (e.g., cut it into 4 large squares or 6 smaller rectangles). In the picture, the baker has also cut a decorative diagonal slice on each portion—you can do this too! Crucially, make a small vent hole (or two) in the center of each scored portion to allow steam to escape. This prevents a soggy top crust. 🌬️
-
Apply the Egg Wash: Brush the entire top surface of the puff pastry with the whisked egg wash. Be generous, but try not to let the wash drip down the sides, as this can ‘glue’ the layers and prevent the pastry from rising fully. 🌟
-
Add Toppings (Optional): Sprinkle a tiny pinch of salt and your chosen seeds (sesame or nigella) over the egg wash for added texture and visual appeal. 🧂
♨️ Baking Instructions
-
Bake to Golden Perfection: Place the prepared baking dish into your preheated 400°F (200°C) oven.
-
The Bake Time: Bake for 30 to 35 minutes. The pastry is done when it is deeply golden brown, wonderfully puffed, and the filling is bubbling hot. If it starts browning too quickly, you can loosely cover the top with foil for the last 10 minutes. ☀️
-
Rest and Slice: Carefully remove the bake from the oven. Let it rest for 10-15 minutes before slicing along your scored lines. This resting period allows the filling to set and prevents it from spilling out when you cut it. ⏳
-
Serve Hot: Serve warm and enjoy the applause! 👏
📄 Page 3: Tips, Serving Suggestions & FAQs 💬
This section ensures your bake is perfect every time and gives the reader ideas on how to enjoy it!
💡 Baker’s Tips for a Perfect Puff
-
Keep it Cold: Puff pastry must be kept cold until it goes into the oven. The cold butter in the dough is what creates all those wonderful flaky layers (the steam from the melting butter lifts the layers). Don’t leave it sitting on the counter! 🧊
-
The Egg Wash is Essential: Don’t skip the egg wash! It’s responsible for the deep, glossy, golden-brown finish visible in the photo. 💛
-
Venting is Crucial: Always remember the vent holes. If steam is trapped inside, the filling will become runny and the crust will become weak and potentially collapse. 💨
-
Check Your Oven Temperature: Use an oven thermometer if possible. If your oven is too cool, the pastry won’t puff up properly. 🌡️
🍽️ Serving Suggestions
This versatile savory bake pairs wonderfully with many sides:
-
The Classic Pairing: A large, simple Green Salad with a tangy vinaigrette (lemon and olive oil dressing). 🥗
-
For Brunch: Serve alongside fresh fruit and a side of plain Greek yogurt for contrast. 🍓
-
As an Appetizer: Cut the squares into smaller triangles (following the decorative cuts) and serve them with a dollop of Tzatziki or a thick balsamic glaze. 🥄
-
Heartier Meal: Pair with a bowl of warm, creamy Tomato Soup. 🥣
❓ Frequently Asked Questions (FAQs)
Q: Can I make this bake ahead of time?
A: Yes, you can! You have two great options:
-
Filling Only: Prepare the red pepper and feta filling up to two days in advance and store it in the fridge.
-
Fully Assembled: Assemble the entire bake (steps 1-7 on Page 2) and refrigerate it for up to 12 hours. Do not apply the egg wash until just before baking. Add 5-10 minutes to the baking time since the dish will be cold. 🕰️
Q: What other fillings work well with puff pastry?
A: Puff pastry is very forgiving! Other popular savory fillings include:
-
Spinach and Ricotta 🌿🧀
-
Caramelized Onion and Goat Cheese 🧅🐐
-
Mushroom and Thyme 🍄
-
Spicy Sausage and Cheese 🌶️🍖
Q: Why didn’t my pastry puff up much?
A: This is usually due to one of three reasons:
-
The pastry got too warm before baking (butter melted).
-
The egg wash dripped down the sides and “glued” the layers together.
-
Not enough heat (oven too cool). Remember: Cold dough + Hot oven = Maximum Puff! 💪
🔥 Enjoy your spectacular, flaky, golden bake! Don’t forget to share your “Yay or Nay” verdict with us! 📸