
- May 31, 2026
Step-by-Step Instructions: Creating the Perfect Layers
Step 1: Prep the Nuts
If you are using raw cashews or macadamia nuts, place them in a bowl and cover them with boiling water. Let them soak for at least 20 to 30 minutes. This softens the nut fibers completely, allowing your blender to pulverize them into an absolute silk cream with zero graininess left behind. After soaking, drain and rinse them thoroughly with cold water.
Step 2: Blend the Vanilla Silk Base
In a high-powered blender or food processor, combine your soaked and drained nuts, the solid coconut cream, the powdered keto sweetener, vanilla extract, and a pinch of salt. Blend on high for 2 to 3 minutes, stopping occasionally to scrape down the sides of the bowl. Continue blending until the mixture is completely uniform, glossy, and thick.
Step 3: Pour and First Chill
Prepare a glass baking dish or a silicone mold. Pour the smooth vanilla base layer directly into the bottom of the dish. Use a spatula to smooth the surface into a perfectly flat, even layer. Place the dish into the freezer for roughly 15 to 20 minutes to allow the surface to firm up slightly. This ensures that when you pour the warm chocolate ganache over it later, the two layers remain beautifully distinct instead of bleeding together.
Step 4: Melt the Chocolate Ganache
While the base is chilling, create your top layer. In a microwave-safe bowl or using a double boiler on the stove, combine your sugar-free dark chocolate chips with a tablespoon of coconut oil or coconut cream. Heat gently in 20-second bursts, stirring thoroughly between each interval, until the chocolate is completely melted, glossy, and smooth. Let it cool for a minute or two so it isn’t scorching hot.
Step 5: Assemble and Set
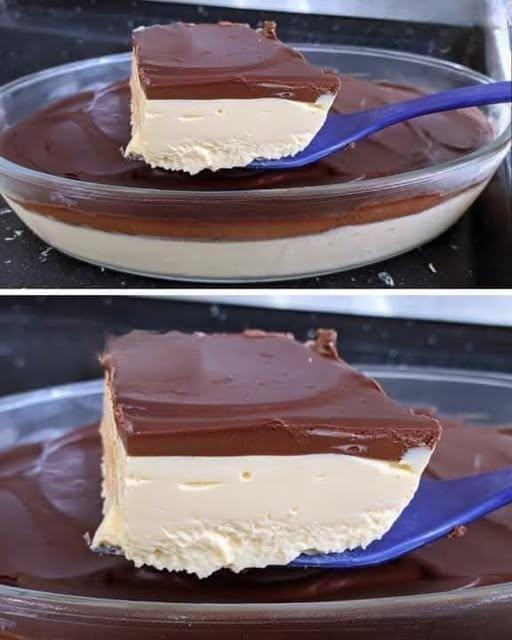
Take your chilled base layer out of the freezer. Gently pour the melted chocolate ganache directly over the top of the white vanilla layer. Tilt the dish back and forth to spread the chocolate evenly across the entire surface, creating that perfect dual-layered effect seen in the reference photo 5675gdf353353.jpg. Return the completed dessert to the refrigerator for at least 2 to 3 hours, or to the freezer for 1 hour, until both layers are thoroughly set and firm to the touch.
Master Chef Pro-Tips for Flawless Silk Bars
Achieving that flawlessly clean cut with a spoon requires just a tiny bit of technique. Here are some pro-tips to ensure your dessert turns out perfectly every single time:
-
The Warm Knife Technique: When you are ready to slice these bars for serving, run a sharp knife under hot water for a few seconds, wipe it dry, and then slice into the dessert. The heat from the blade will glide smoothly through the top chocolate layer without cracking it, giving you beautiful, restaurant-quality squares.
-
Controlling the Coconut Flavor: If you or your kids are not huge fans of coconut, don’t worry! You can easily mask the flavor. Use refined coconut oil (which has completely neutral flavor and zero coconut aroma) in the ganache layer. Additionally, adding a touch of natural almond extract or extra vanilla to the base layer completely tones down any residual coconut notes from the cream.
-
Troubleshooting Texture: If your blender is struggling to get the base completely smooth, add just one tablespoon of unsweetened almond milk or light coconut milk at a time to help keep the blades moving. Be careful not to add too much liquid, as we want the bars to remain thick and sliceable rather than runny.
Customization Variations to Try Next Time
Once you have mastered the classic vanilla and chocolate layers shown in 5675gdf353353.jpg, you can use this recipe as a blank canvas for all kinds of fun flavor variations:
-
Peanut Butter or Almond Butter Twist: Swirl a couple of tablespoons of unsweetened, keto-friendly peanut butter or almond butter directly into the vanilla base layer before pouring it into your dish for an instant peanut butter cup upgrade.
-
Mint Chocolate Chip: Add a tiny drop of pure peppermint extract and a speck of natural green food coloring (like spinach powder or spirulina) to the base layer for a refreshing, festive holiday treat.
-
Berry Burst Layer: Press a few fresh, low-carb raspberries or blackberries directly into the vanilla layer before adding the chocolate ganache for a tart, fruity contrast that balances out the rich chocolate beautifully.
Proper Storage Guidelines
Because this recipe relies entirely on natural plant-based fats to stay solid, these bars are best kept cold until right when you are ready to enjoy them.
-
In the Refrigerator: Store your sliced bars in an airtight container for up to 5 to 7 days. They will maintain an ultra-creamy, spoonable texture right out of the fridge.
-
In the Freezer: If you want to make a double batch and save some for later, these bars freeze beautifully. Wrap individual squares tightly in parchment paper and store them in a freezer-safe bag for up to 3 months. Simply let them thaw on the counter for 5 to 10 minutes before serving to achieve that perfect silk texture once again.