
- December 6, 2025
👩🍳 Step-by-Step Instructions: Crafting Your Dream Dessert! 🛠️
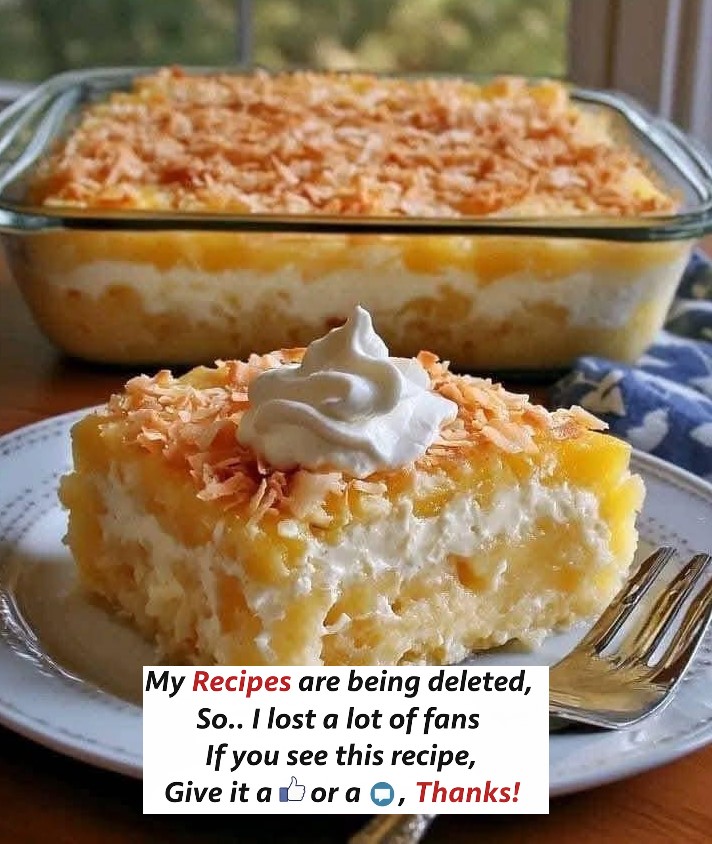
Follow these simple steps to assemble your stunning Pineapple Lush Dessert. We recommend using a 9×13 inch baking dish for the perfect layers! 📏
Phase 1: Creating the Graham Cracker Crust 🏗️
-
Prep the Pan: Lightly grease your 9×13 inch pan. (Optional: Line with parchment paper for easy lifting/cutting).
-
Combine Ingredients: In a medium bowl, mix the Graham Cracker Crumbs, melted butter, and sugar (if using) until the crumbs are evenly moistened. It should have the consistency of wet sand. 🏖️
-
Press the Crust: Firmly press the crumb mixture into the bottom of the prepared pan. Use the bottom of a measuring cup or a flat spatula to ensure the crust is compact and even. The key to a good crust is firm pressing! 🎯
-
Chill: Place the pan in the freezer for 10-15 minutes or the refrigerator for 30 minutes while you prepare the fillings. This helps the crust set up and prevents it from getting soggy. 🥶
Phase 2: Whipping Up the Cream Cheese Layer 🥣
-
Whip the Cream (If using Heavy Cream): In a large bowl, use an electric mixer (handheld or stand mixer) to beat the cold heavy cream until soft peaks form. Gradually add a few tablespoons of the powdered sugar until stiff peaks form. Set aside. This is your homemade whipped cream! 💖
-
(Quick Note: If using pre-made whipped topping, skip this step and let the tub thaw in the fridge).
-
-
Cream the Cheese: In a separate medium bowl, beat the softened cream cheese until it is completely smooth and fluffy, with no lumps remaining. This takes about 2-3 minutes. Add the vanilla extract and any remaining powdered sugar. Continue beating until fully incorporated. 🌀
-
Fold and Combine: Gently fold (don’t beat!) the whipped cream (or thawed whipped topping) into the cream cheese mixture using a rubber spatula. This keeps the filling light and airy. Stop mixing just when no streaks of plain cream cheese are visible. ✨
-
Spread the Filling: Spread the fluffy cream cheese layer evenly over the chilled crust. Return the dish to the refrigerator while you make the pineapple layer. 🧊
Phase 3: Preparing the Pineapple Topping 🍍
-
Drain THOROUGHLY: This is the most important step! Drain the crushed pineapple in a fine-mesh sieve, pressing down firmly with a spoon to remove as much liquid as possible. Excess liquid will make your dessert watery. 💧
-
Mix the Topping: In a bowl, combine the well-drained crushed pineapple, the dry instant pudding mix, and the granulated sugar. Stir well until everything is evenly combined. The mixture will start to thicken almost immediately as the dry pudding powder absorbs the moisture from the pineapple. ⏳
-
Layer and Smooth: Carefully spoon and spread the pineapple mixture over the cream cheese layer. Use the back of a spoon to gently smooth it out. Be careful not to mix the layers! 🥄
Phase 4: The Final Touches & Chilling! 🥶
-
Toast the Coconut: Spread the flaked coconut on a dry skillet over medium-low heat or on a baking sheet. Toast, stirring frequently, until the flakes are golden brown and fragrant. This takes about 3-5 minutes. Watch closely—coconut burns easily! 🔥
-
Garnish: Sprinkle the toasted coconut evenly over the top pineapple layer. Let the dessert cool completely before garnishing with extra whipped cream.
-
Chill Time: Cover the pan loosely with plastic wrap. Refrigerate for a minimum of 4-6 hours, but preferably overnight. Chilling allows the layers to set up perfectly, making the dessert easier to cut and ensuring a delightful texture. 😴
-
Serve: Cut into squares, and top each slice with a dollop of fresh whipped cream before serving. Enjoy this slice of tropical paradise! 🏝️ Yum! 😋
💡 Pro Tips & FAQs: For the Perfect Pineapple Dessert! 💯
How do I make this dessert even faster?
-
Use pre-made graham cracker crusts from the grocery store. This saves about 20 minutes of prep and cleanup. ⏱️
-
Use a large tub of thawed frozen whipped topping (like Cool Whip) instead of whipping heavy cream from scratch. It maintains its structure very well and is quicker! 🌬️
Can I use fresh pineapple? 🍍
-
While fresh is great, it’s NOT recommended for this recipe. Fresh pineapple contains enzymes that prevent instant pudding from setting properly, leading to a runny dessert. Stick to the canned, crushed variety for the best results! 👍
How do I store leftovers? 📦
-
Cover the dish tightly and store leftovers in the refrigerator for up to 3-4 days. The crust will slowly soften over time, but the flavor remains wonderful! ✨
-
Freezing: This dessert freezes surprisingly well! Cover it tightly with plastic wrap and foil. Freeze for up to 1 month. Thaw in the refrigerator overnight before serving. 🧊
SEO Keywords for Visibility: 🔍
This section helps others find this amazing recipe!
-
No-Bake Pineapple Dessert
-
Pineapple Lush Recipe
-
Easy Layered Dessert
-
Tropical Cream Cheese Dessert
-
Toasted Coconut Topping
-
Quick Summer Dessert
-
Graham Cracker Crust
⭐ Conclusion: Your New Favorite Dessert Awaits! 💖
This No-Bake Pineapple Cream Dessert is the perfect blend of creamy, crunchy, sweet, and tangy. It’s truly a recipe worth keeping! Whether you call it Pineapple Dream, Pineapple Delight, or Pineapple Lush, it’s guaranteed to bring a smile to everyone’s face. Don’t forget to SHARE and SAVE this recipe so you don’t lose it! Happy baking (or rather, no-baking)! 🎉


