
- May 18, 2026
Step-by-Step Instructions
This entire recipe comes together right on your stovetop. Grab a reliable 9-inch or 10-inch non-stick skillet with a tight-fitting lid, and follow these simple steps.
Step 1: Prepare the Apples
Wash, peel, and core your 3 apples. Cut them into even, uniform slices about a quarter-inch thick. Cutting them to the same thickness ensures they cook through at the exact same rate.
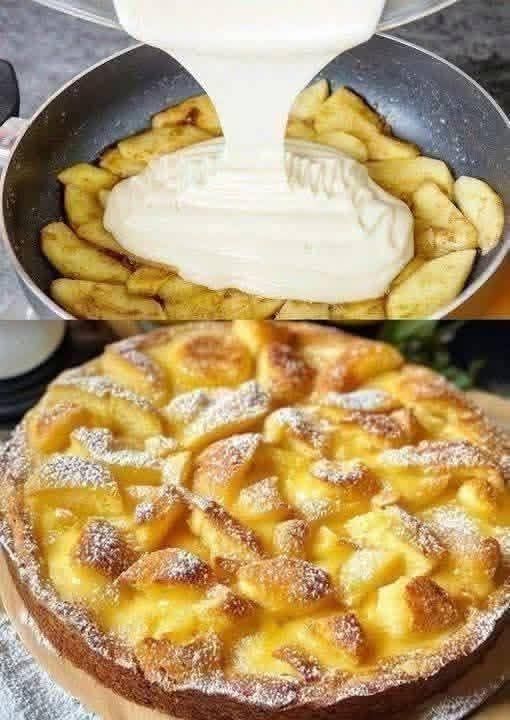
Step 2: Sauté and Caramelize
Place your non-stick skillet over medium heat and melt the 2 tablespoons of unsalted butter. Once the butter is melted and foaming, add the apple slices to the pan. Sprinkle the 2 tablespoons of granulated sugar and 1 teaspoon of ground cinnamon evenly over the top. Stir gently to coat all the apple slices in the spiced butter. Let them cook for about 4 to 5 minutes, stirring occasionally, until the apples begin to soften and develop a light, glossy caramel coating. Arrange them into an even layer covering the bottom of the skillet.
Step 3: Mix the 10-Minute Batter
While the apples are simmering, quickly whip up your pourable cake batter. In a medium mixing bowl, whisk together the egg, 0.25 cup of granulated sugar, and vanilla extract until the mixture becomes pale and slightly frothy. Stream in the vegetable oil and whole milk, whisking continuously until fully combined.
In a separate small bowl, whisk the all-purpose flour, baking powder, and a pinch of salt together. Pour the dry ingredients into the wet ingredients. Use a spatula or whisk to gently mix the components just until the flour disappears and a smooth, thick, yet pourable batter forms. Be careful not to overmix, as overworking the batter can develop the gluten and result in a dense cake rather than a light, fluffy crumb.
Step 4: Pour and Cover
Turn the stovetop heat down to low. Slowly and evenly pour the cake batter directly over the hot, caramelized apples in the skillet. The batter should naturally flow into the spaces between the apple slices and cover them completely. If necessary, use the back of a spoon or a spatula to gently smooth the top so the batter reaches the edges of the pan.
Step 5: Cook to Golden Perfection
Cover the skillet immediately with a tight-fitting lid. This is crucial because the trapped steam helps cook the top of the cake while the bottom develops a gorgeous golden crust. Keep the heat on low and let the cake cook undisturbed for 10 to 12 minutes.
You will know it is ready to flip when the edges look set, the surface is no longer wet, and small bubbles have formed and popped on top, similar to cooking a pancake. Gently touch the center of the cake; it should feel springy.
Step 6: The Quick Flip (Optional but Recommended)
If you prefer a cake that is beautifully browned on both sides, you can flip it. Place a large, flat plate over the top of the skillet. Using oven mitts, firmly hold the plate against the skillet and confidently invert the pan so the cake slides out onto the plate, apple-side up. Carefully slide the cake back into the skillet, raw-side down, and cook uncovered for an additional 2 to 3 minutes just to set and lightly brown the bottom.
Alternatively, if your lid seals perfectly and the cake is fully set through to the top after 12 minutes, you can skip the flip entirely and serve it straight from the pan!
Step 7: Garnish and Serve
Slide the finished cake onto a serving platter or cutting board. Let it cool for about 5 minutes so the caramel settles slightly. Dust the top generously with powdered sugar through a fine-mesh sieve. Slice it into warm wedges and serve immediately.
Pro Tips for the Ultimate Stovetop Cake
-
Control the Heat: The biggest secret to success with stovetop baking is managing your burner. Because the cake sits directly over the heat source, keeping the flame on low once the batter is added prevents the caramelized bottom from burning before the center cooks through.
-
Use the Right Pan: A high-quality non-stick skillet or a well-seasoned cast-iron skillet is essential for this recipe. It ensures the caramelized apples slide out beautifully without sticking to the bottom.
-
Test for Doneness: Just like a traditional baked cake, you can insert a toothpick into the center of the crumb. If it comes out clean or with a few moist crumbs, your skillet cake is officially done.
Frequently Asked Questions
Can I make this recipe gluten-free?
Yes! You can easily swap the all-purpose flour for a high-quality 1:1 gluten-free baking flour blend that contains xanthan gum. The texture will remain beautifully tender and fluffy.
What are the best apples to use for a skillet cake?
Granny Smith apples provide a wonderful tart contrast to the sweet caramel and cake batter. If you prefer a sweeter flavor profile, Honeycrisp, Fuji, or Gala apples work wonderfully and maintain an excellent texture without turning into mush.
How do I store leftovers?
If you happen to have any leftovers, allow the cake to cool completely to room temperature. Place it in an airtight container and store it in the refrigerator for up to 3 days. When you are ready to enjoy a slice, simply pop it in the microwave for 15 to 20 seconds to revive that warm, fresh-out-of-the-pan texture.


