
- December 5, 2025
♨️ Page 2: Baking, Cooling, and the Glaze Magic
Phase 3: Baking the Loaf
-
Pour & Tap: Pour the batter into your prepared loaf pan. Give the pan a gentle tap or two on the counter to release any large air bubbles. 💨
-
Bake: Place the pan in the center rack of your preheated oven. Bake for 50 to 65 minutes.
-
Crucial Timing: Start checking at the 50-minute mark. Due to the high moisture content, it may take longer than a standard cake.
-
-
Check for Doneness: The cake is done when a toothpick inserted into the center comes out with moist, tender crumbs attached, but not wet batter. If it’s browning too quickly, you can loosely tent it with aluminum foil for the last 15-20 minutes. 🌡️
-
Cooling (Initial): Once baked, remove the loaf from the oven. Let it cool in the pan for 10 to 15 minutes. This prevents the delicate, hot cake from crumbling when you remove it. ⏲️
-
Full Cool Down: Use the parchment paper sling to carefully lift the cake out of the pan and transfer it to a wire rack. It must cool completely before glazing. If you glaze a warm cake, the ganache will simply melt and slide off! 🥶
✨ Step-by-Step Instructions: Making the Ganache Glaze
While the cake is cooling, you can prepare the beautiful, glossy glaze that makes the loaf look so irresistible!
Phase 4: Glazing Perfection
-
Prep the Chocolate: Place the chocolate chips (or chopped chocolate) in a heat-safe bowl. 🍫
-
Heat the Cream: Pour the heavy cream into a small saucepan. Heat it gently over medium heat until it just begins to simmer around the edges, or until small bubbles form. Do not let it boil vigorously! Alternatively, microwave the cream in 30-second intervals until very hot. 🔥
-
Pour and Wait: Pour the hot cream directly over the chocolate chips. DO NOT STIR YET! Let it sit undisturbed for 5 minutes. This allows the heat of the cream to melt the chocolate evenly from the bottom up. Patience is key for a smooth ganache! 🧘
-
Whisk to Gloss: After 5 minutes, gently whisk the mixture, starting in the center and working your way outwards. It will start to look like separated liquid, but keep whisking! The mixture will suddenly emulsify into a thick, uniform, and incredibly glossy ganache. ✨
-
Add Butter (Optional): Whisk in the tablespoon of butter now, if using. It adds a professional, mirror-like shine to the glaze!
-
Glazing Consistency: You want the ganache to be pourable, but not watery. If it’s too thick, add a tiny splash ($1/2$ tsp) of hot water or cream. If it’s too thin, let it sit for a few minutes to cool and thicken up slightly. ⏳
-
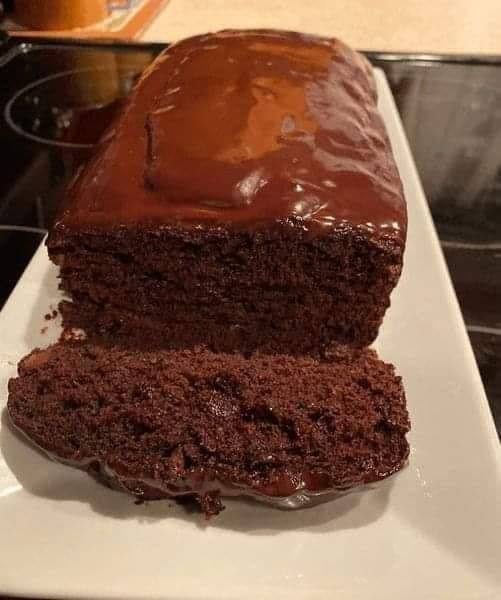
Drizzle and Spread: Place the cooled cake on the wire rack over a baking sheet (to catch drips—easy clean-up!). Slowly pour the ganache over the top center of the loaf. Use the back of a spoon to gently push the glaze to the edges, allowing it to drip attractively down the sides, just like in your photo! 🤤
🍰 Page 3: Finishing Touches, Serving, and Storage
Phase 5: The Grand Finale and Serving
-
Set the Glaze: Let the glazed loaf sit at room temperature for at least 30 minutes (or in the refrigerator for 15 minutes) until the ganache has set and has a firm, satin-matte finish. 💖
-
Slice and Enjoy: Once set, transfer the loaf to a serving plate. Use a large, sharp, non-serrated knife to slice the cake. Wiping the knife clean between slices ensures those beautiful, clean cuts! 🔪
-
Serving Suggestions: This cake is delicious on its own, but you could also serve it with:
-
A dusting of powdered sugar ❄️
-
A dollop of fresh whipped cream 🍦
-
Fresh raspberries or strawberries 🍓
-
A scoop of vanilla bean ice cream (warm the slice for 10 seconds for a lava-cake effect!) 🤯
-
⭐️ Extra Tips for Chocolate Cake Perfection!
-
Room Temperature Ingredients: Ensure your eggs, milk, and any dairy are at room temperature. They mix into the batter much more smoothly, leading to a lighter, more uniform crumb! ☀️
-
Don’t Overbake! The enemy of a moist cake is overbaking. Since this cake is dark, it can be hard to tell when it’s done. Trust the toothpick test: a few moist crumbs are perfect, but a wet knife is a sign to keep baking! 🕰️
-
The Power of Coffee: Coffee doesn’t make the cake taste like coffee; it enhances the natural flavor of the cocoa powder, making it taste more intensely chocolatey. Don’t skip it! ☕
🏡 Storage and Longevity
-
Room Temperature: The cake can be stored in an airtight container at room temperature for up to 3 days. The ganache acts as a seal, keeping the cake incredibly moist.
-
Refrigeration: For longer storage, you can refrigerate it for up to 1 week. Allow slices to come back to room temperature before eating for the best texture and flavor. ❄️
-
Freezing: This cake freezes beautifully! Wrap the unglazed loaf tightly in plastic wrap, then a layer of aluminum foil. Freeze for up to 3 months. Thaw overnight at room temperature, then make the glaze! 🧊
Enjoy your baking project! You’ll be rewarded with a spectacular, bakery-quality chocolate loaf cake that is every bit as delicious as it looks! 🎉


